|
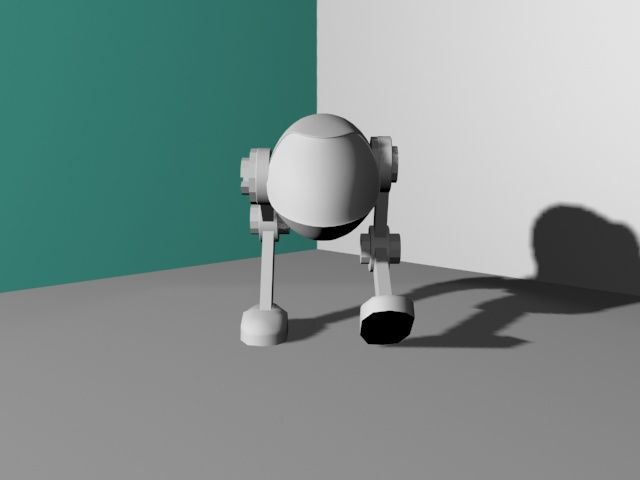
In class, I have started working with different lights and techniques in 3Ds Max. There are six different types of lights in 3Ds Max Omni, directional, skylight, spot, sun positioner, and Arnold lights. Omni lights create an equal amount of light in all directions. Directional lights create light that stays in one single direction. skylights create light all around a scene. Spotlights create a beam of light in a cone shape. Sun positioner lights create sunlight and positions geographically correct angle and movement of the sun over the earth on your scene. Arnold lights are lights designed for the Arnold renderer. With these lights, I have practice different lighting techniques in class. The most I had practice with is the three-point lighting technique. The three-point lighting technique is when you use three lights in a scene to light up a subject, the key, fill, and rim/back light. The key light is in front of the scene and is the most intense light to create the strongest shadow. The fill light is a less intense light that is used to fill the scene space around the subject with light. The rim/back light is placed behind the subject. It is used to light up the edge of the subject. I used this technique to light up my robot in a scene that you can see below. I have only worked with lights for a week and still need more practice but I should become a lot better soon.
0 Comments
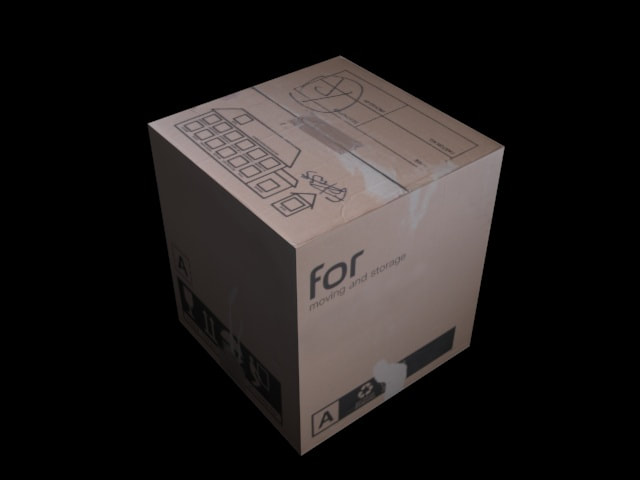
This week I have been working on UVW mapping in 3Ds max. UVW mapping is a technique used to place 2D images on a 3D models surface using the Cartesian coordinate system. The U is for the X coordinate V is for the Y coordinate and W is for the Z coordinate. For me, UVW mapping is not to hard but I just started so I'm still learning the basics. But from what I have done I do not seem too difficult. The first thing I made with UVW mapping is the box you can see below with different images. Right now I am working on creating a model of a board game box by taking pictures of all its different sides and editing them in Photoshop. In Photoshop I make sure that the images are the right size and shape for the 3D model in 3DS Max. Then once I'm done editing them I will map them onto the box using the UVW mapping technique.
 Over the last couple of weeks, I have been practicing creating 3D animations. Most of the animations I have made using particle systems, forces, cloth, and massFX. Particle systems are used for creating animations for lots of small objects like water drops and snow. I used it for a fountain animation to simulate the water spraying out the top of the fountain shown at the bottom of the post. Forces are used to add effects like gravity or wind to your particle system. I have also used this in my fountain animation to make the drops of water fall down instead of going up. The cloth modifier is us to create realistic looking fabrics that can be affected by forces like wind. I used the cloth modifier for making a model with a table cloth and flags on top of a table you can see it in my work page on this web site. MassFX is a way to add realistic simulations to rigid bodies. Rigid bodies are objects that do not change shape in an animation. There are three types of rigid bodies called dynamic, kinematic, and static. Dynamic objects are controlled completely by the simulation moved with gravity and other objects. Kinematic objects are animated using normal animating methods and can't be affected by other objects. Static objects are like kinematic but just can't be animated and are used for bottles and obstacles. I am still trying to master all these modeling techniques in class and have more to learn. I will post on all the new things learn. |
