|
I have learned a lot this year in DDA-II here are some of the main things I leaned. How to create cool advanced models in 3DS Max using 2D shapes called splines. This is how I made my chest set that you can see at the bottom of the post. Learning how to use materials to make the models look more realistic and not just a solid color. Now I can make all my models and scenes look realistic when I make them. leaning how to use and position lights and cameras for different scenes. The most hard but cool thing I learned was how to create animations with rigging. I was able to make different objects and characters move around. The most rewarding experiences I have had in this class is Leaning how to make the models look realistic using UVW mapping and then being able to animate those models is super cool. The skills that I think will follow me into the future are being able to create professional looking portfolio where I can show all my skill that I have learned over time. This will help me be able to share my work with other that are interested in the same thing. I also think that being able to create multiple realistic looking 3D models in 3DS Max will also fallow me into the future. 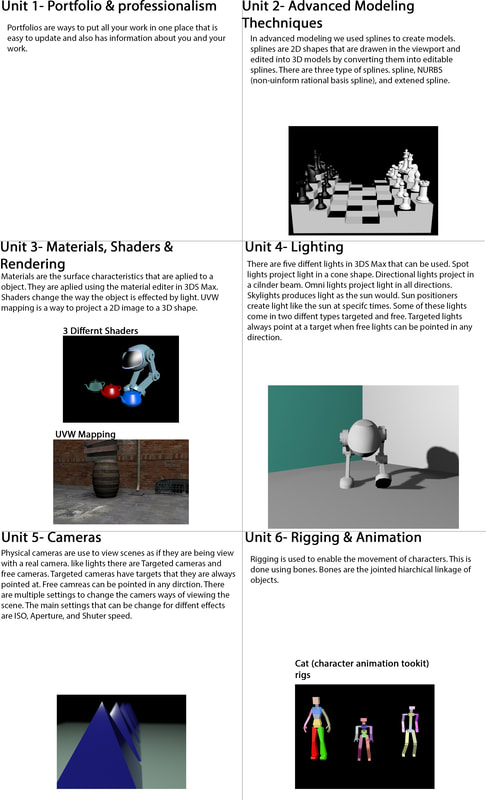
0 Comments
In class, I have started working with different lights and techniques in 3Ds Max. There are six different types of lights in 3Ds Max Omni, directional, skylight, spot, sun positioner, and Arnold lights. Omni lights create an equal amount of light in all directions. Directional lights create light that stays in one single direction. skylights create light all around a scene. Spotlights create a beam of light in a cone shape. Sun positioner lights create sunlight and positions geographically correct angle and movement of the sun over the earth on your scene. Arnold lights are lights designed for the Arnold renderer. With these lights, I have practice different lighting techniques in class. The most I had practice with is the three-point lighting technique. The three-point lighting technique is when you use three lights in a scene to light up a subject, the key, fill, and rim/back light. The key light is in front of the scene and is the most intense light to create the strongest shadow. The fill light is a less intense light that is used to fill the scene space around the subject with light. The rim/back light is placed behind the subject. It is used to light up the edge of the subject. I used this technique to light up my robot in a scene that you can see below. I have only worked with lights for a week and still need more practice but I should become a lot better soon.
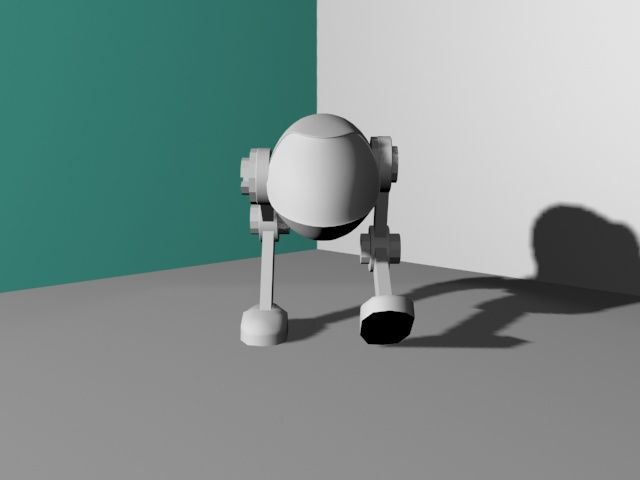 This week I have been working on UVW mapping in 3Ds max. UVW mapping is a technique used to place 2D images on a 3D models surface using the Cartesian coordinate system. The U is for the X coordinate V is for the Y coordinate and W is for the Z coordinate. For me, UVW mapping is not to hard but I just started so I'm still learning the basics. But from what I have done I do not seem too difficult. The first thing I made with UVW mapping is the box you can see below with different images. Right now I am working on creating a model of a board game box by taking pictures of all its different sides and editing them in Photoshop. In Photoshop I make sure that the images are the right size and shape for the 3D model in 3DS Max. Then once I'm done editing them I will map them onto the box using the UVW mapping technique.
 Over the last couple of weeks, I have been practicing creating 3D animations. Most of the animations I have made using particle systems, forces, cloth, and massFX. Particle systems are used for creating animations for lots of small objects like water drops and snow. I used it for a fountain animation to simulate the water spraying out the top of the fountain shown at the bottom of the post. Forces are used to add effects like gravity or wind to your particle system. I have also used this in my fountain animation to make the drops of water fall down instead of going up. The cloth modifier is us to create realistic looking fabrics that can be affected by forces like wind. I used the cloth modifier for making a model with a table cloth and flags on top of a table you can see it in my work page on this web site. MassFX is a way to add realistic simulations to rigid bodies. Rigid bodies are objects that do not change shape in an animation. There are three types of rigid bodies called dynamic, kinematic, and static. Dynamic objects are controlled completely by the simulation moved with gravity and other objects. Kinematic objects are animated using normal animating methods and can't be affected by other objects. Static objects are like kinematic but just can't be animated and are used for bottles and obstacles. I am still trying to master all these modeling techniques in class and have more to learn. I will post on all the new things learn. In the past few weeks I have learned a lot of new ways to create models in 3dsmax. Like how to scatter a compound object across the surface of another object. This new skill helped me make the spikes on the cactus I made on the my work page. The next thing I tried was making tool by creating and lofting splines. You can see the Phillips head screwdriver I made with splines in the my work page too. After that I started working with blobmesh and arrays in class and now I am working on creating chess pieces and a chess board with all the skill I have learned.
This past week me and my class have been working in 3D Max. 3D Max is a program the allows you to create 3D models. Using 3D Max we have been able to create snowmen, robots, spaceships, and lots of other things. We use tutorials to learn how to create all these 3D models with the different tools. We also learned how to use different modifiers that we can use to add detail to our models and shapes.
In the last weeks before spring brake we have been working on a video project. In this project we had to get in to groups of three and make a PSA. I grouped up with Max and Daniel. We decided to make our PSA about school police and their equipment. Our video shows a school shooter coming into the school and shooting the police officer. Then Max the explainer explains to the cop why he could not protect the school.
We have been working with video in premiere pro. First we had to learn camera shots and angles. The were ten we had an assignment on over the shoulder, point of view, wide or long shot, medium shot, close up, eye level, low angle, high angle, birds eye, and dutch tilt. We had to find images from movies for every type of camera shot. The next assignment Mr.B gave us was to find videos from some websites he told us to look at. they are called Pexels Videos and Videezy. Then we had to get music from some more websites called Bensound, Free Music Archive, Creative Commons Music, and more but I just used Videezy and Free Music Archive. Then we put it all together in premiere pro. Here is mine.
We have started working in premiere pro for Mr.B class this week. We had to make a video out of picture related to a certain color. I picked yellow because its my favorite color. We had to make the video get more intense as it went on by starting with a picture with a little bit of the color you chose then increase speed of the picture when you get to the pictures with the most of your color. This is supposed to help us practice with using color in video and editing video.
We are still working un illusrator. Mr.B has given us a bunch of assiments to work on for illusrator. A lot of it is with the pen tool. The pen tool is used to trease and make shapes. On one assiment he had us make a cheese burger with the pen tool. He also had us trase a frog too.
|
